This menu allows you to view and customize myrentcar's existing chart of accounts. When you enter this menu, you can search for a particular account by clicking on the  button.
Account search
The  button can be used to search for an account, or to display a list of all accounts available in the database of your myrentcar vehicle rental accounting software.

 This field allows you to search and filter results in ascending or descending order by account.
 This field allows you to search and filter results in ascending or descending order by account shortcut.
 This field allows you to search and filter results in alphabetical order.
 Filter results by account type.
 This field allows you to search and filter results by account grouping.
Create an account
In myrentcar, there are 2 ways to create an account:
- either directly from this list by clicking on the
 button
 - or from an existing logbook (using the action buttons).
Once you've launched the creation process, a new window appears, asking for the account number and a shortcut to it.

This is necessary in order to proceed to the next step, as both fields are mandatory.
In the event of a cancellation, myrentcar always asks for validation, to avoid incorrect handling and the need to go back to the current step.

Once the file has been created, the mandatory fields (marked with a red asterisk) must be entered in order to validate the file. If these fields are left blank, a message will be displayed, preventing the file from being saved.
Account modification
After clicking on one of the results in the list, or by searching for a specific account using the shortcut search, a new window opens for the account record.

Please note that some modifications require access to each user, with only the admin having full rights for each action.
Fields must be filled in as required, especially those marked with a red asterisk.
- The first block shows general account information, i.e. the account number and shortcut, which are no longer modifiable (depending on the user type), and the title, which is the name of the particular account.
- The second block displays three separate menus with different fields.
Account tab
The "Account" menu displays the most important information about the account:

This field is used to type the account in relation to the data displayed.
Clicking on this field displays the available values.

This field is used to group accounts in relation to the grouping list fed by the grouping accounts created in account management.
By clicking on ![]() , a new window appears, allowing you to search for the value to be included for the particular account.
, a new window appears, allowing you to search for the value to be included for the particular account.

 This field is used to assign the account to a value.
 This field is used to assign the account to analytics. Two choices, yes or no, are displayed after clicking on the field.
 This field is used to centralize the account.
 This field is used to define the VAT rate to be applied to the account.
- An interface displays the balance for operations carried out by the particular account. By clicking on the
 button, the result is displayed for 3 fiscal years:
- "N-1" for the previous fiscal year.
- "N" for the current year.
- "N+" for the following year.

Accrued tab
The cumulative menu displays monthly account balances and totals. Pressing the  button displays the result for the current year:

Notes tab
This menu allows you to add notes to a particular account. Note that the "Note" field is optional and does not affect the operations performed by the account.
Once the account has been created, an action banner appears at the bottom of the page for further functionality.
 This button saves changes made to the file.
  This button returns you to the account list.
 This button is used to create a new account.
 This button directly displays the general ledger associated with the particular account. By clicking on it, a new window appears to display the result.
To move on to the next step, click on the  button to display all the criteria required for the general ledger result.

- The "Criteria" button is used to close the filter.
- The "Cancel" button is used to cancel the request.
- The "Clear" button is used to clear all criteria added to the search fields.
- Once you've filled in the fields required for your search, all that's left to do is to validate your search by clicking on the "Search" button, and the general ledger is displayed.

- You can download the ledger in Excel format by clicking on the
 button.
  This button deletes the consulted record.
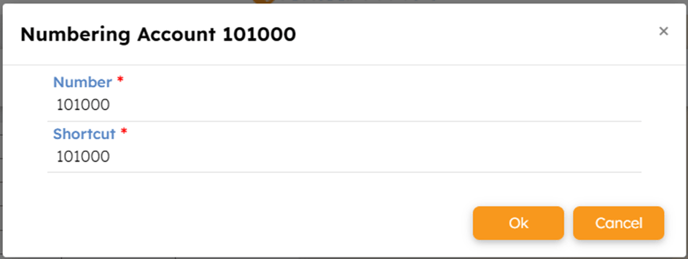
 This button is used to rename the account number and shortcut. Clicking it opens a window for modification. This procedure depends on the type of user; only the admin has the right to make such a manipulation.